How to create a project on Logibooth for 360 Booth videos
Creating immersive 360° videos using Logibooth can transform any event into a memorable, shareable experience. Whether you’re planning a wedding, corporate event, or a festive party, a 360° video booth adds a unique flair that’s bound to impress your guests. Here’s a step-by-step guide on how to create a project on Logibooth for captivating 360° booth videos.
Step 1: Set Up Your Logibooth Account
Before you can start creating, ensure you have a Logibooth account. Open the Logibooth app, and sign up or log in. Once you’re logged in, navigate to the home dashboard where you can see manage your projects.
Step 2: Create a New Project
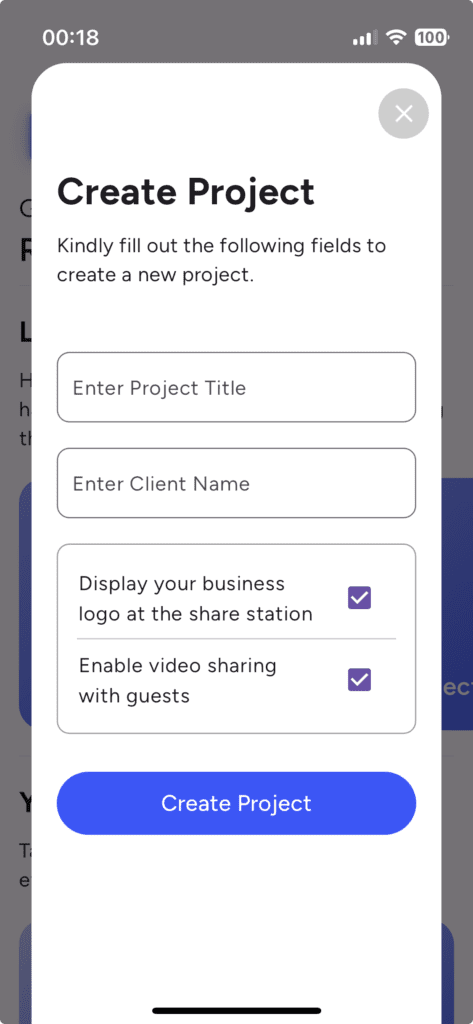
To begin, locate the ‘Create Project’ button on your dashboard. Click on it, and you’ll be prompted to enter details such as the project name, client name. This information helps you organize multiple projects and access them easily.

Step 3: Select the additional options
After you’ve set up the initial project details, you’ll need to specify if you want to display your business logo at the share station and if you want to share the 360 videos to your guests.
Step 4: Customize Your Settings
With the 360° booth selected, you can now customize various settings:
- Camera Setup: Choose the type of camera you’ll use. Logibooth supports a range of cameras, so select one that best fits your quality requirements and budget. Go to the Home Page > App Settings > Change camera view.
- Video Effects: These effects determine how long the video will be. Open your project settings, scroll down to section 2 “Add video effects” and choose one of the given effects.
- Branding Options: Add custom frames, overlays, or logos to personalize or brand the videos. This is perfect for corporate events or promotional activities.
Step 5: Configure the Equipment
Setting up the physical components is crucial. Ensure your 360° camera is securely mounted on the booth platform.
Step 6: Test Your Setup
Before the event, conduct a full test run:
- Check the camera’s angle and rotation speed to ensure it captures the full scope of the booth.
- Record a test video to confirm everything works seamlessly— from video capture and processing to playback.
Step 7: Launch Your Project
On the day of the event, open your Logibooth project and activate the booth. Ensure there is someone to assist and guide the guests on how to use the booth. This helps in capturing the best moments and reduces the chance of technical issues.
Step 8: Monitor and Manage the Booth
Use the Logibooth dashboard to monitor the booth’s activity. You can view live previews, check the number of videos recorded, and ensure that the equipment functions correctly throughout the event.
Step 9: Analyze Feedback
After the event, review any feedback you received regarding the booth. Logibooth often provides analytics about video views and shares, which can be invaluable for understanding engagement levels and planning future events.
Creating a 360° video booth project with Logibooth is straightforward if you follow these steps. It not only adds an element of fun to your event but also leaves guests with a digital keepsake that they can look back on and share. So, get creative and let your guests spin around the fun!


